About Me

My photo
Pacific Northwest, United States

Welcome

I've been crafting things for myself and others since my teen years. Designing and creating is not just what I do.....it's Who I Am. Thanks for stopping by.

Sunday, March 31, 2013

Got It Done–March 2013

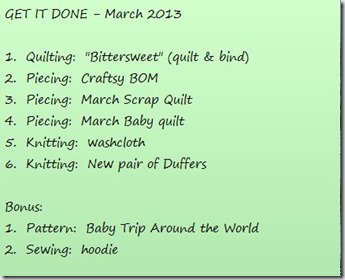
GID-MarchThis was the list of tasks I wanted to accomplish during the month of March.  Unfortunately, I did not get any of my bonus projects done.


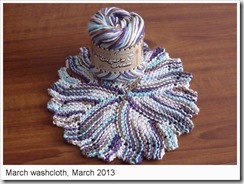
March Knit Washcloth

March washcloth
This was a fun pattern to work.  I used 100% cotton variegated yarn and size 8 knitting needles.
The finished size is about 9-inches diameter.


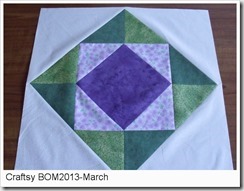
Craftsy 2013 March BOM
BOM2013-March
This block is called “Economy Block” (for some unknown reason) and measures 17-1/2” square.
I don’t recall learning any new techniques in constructing this block, but the instructor did give an excellent lesson on drafting blocks from scratch.  She took us through the steps of drafting a 4-patch block in different sizes.  Drafting is right up my alley since that’s what I do for a living (when I work). 


March Baby Quilt
BFS-quilt-032813
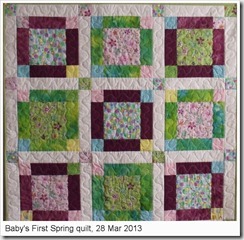
“Baby’s First Spring” is a 38” x 38” baby quilt.
I used bright cotton fabrics for the top, Warm N Natural cotton batting and flannel for the backing. 


Baby quilt top
9PP-baby-top
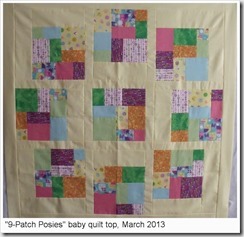
“9-Patch Posies”
This quilt top measures 40” x 40”


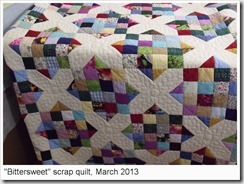
“Bittersweet” quilt
DSCF1154
I still have the binding to sew on this quilt and it will be done.  I really like how it turned out.


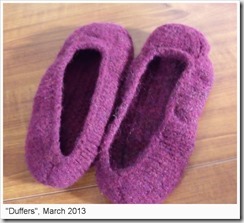
“Duffers”
Duffers
These knitted slippers are really easy to make.
Even though I put these in the washer together, one seems to be more felted than the other.  They are still too big, so I will try to felt them again.  Hopefully they will come out the same size.


Get It Done goals for April 


This coming month will be a busy one for me, but I'm hoping to be able to do some serious sewing as well.  We shall see.....
Here's my list:


I'm linked up with Patchwork Times.
Thanks for stopping by.
       ~Diane

Friday, March 29, 2013

On The Needles–Mar 29, 2013

OTN-032913
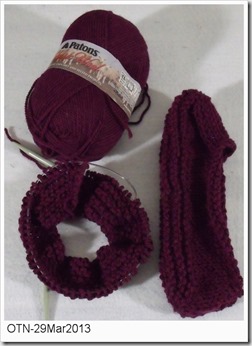
I promised myself that I’d make a new pair of “Duffers” to replace the pair I wore out.  I did some darning on the old pair, but they’re too far gone and I want a pretty new pair.
I’m using a ball of Patons Classic Wool, plum heather color and US size 11 needles. 

The pattern can be found at mindie.wordpress.com.   These slippers knit up quickly, having only 19 rows.  I’m making the original which is knit flat and sewn down the heel and bottom of the foot.  After I’ve completed the second slipper, I will felt them in the washing machine.  Can’t wait to get these on my feet.

What’s on your needles?  Check out the links at Patchwork Times to see what other’s are knitting this week.
             ~Diane

Monday, March 25, 2013

Design Wall Monday–Mar 25, 2013

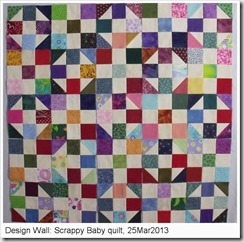
I’m still on a mission to use up fabric scraps. 

Until a few days ago I had not settled on a design for my March scrap quilt and the end of the month is fast approaching.  I saw a Bonnie Hunter quilt, Patches & Pinwheels, and used it for inspiration.  I switched her 16-patch for a nine-patch block and her pinwheel for another block style mainly because I wanted to use 2-1/2” scrap squares and, truth be known, I really don’t like pinwheels (for some unknown reason). 
DWM-032513

While I was placing the blocks on the design wall, I discovered that I had made one of the blocks incorrectly.  Can you tell which one it is? 


Patches&Plates
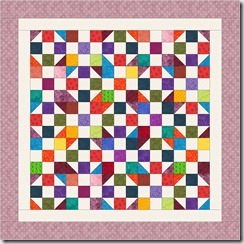
Here’s my EQ plan for this quilt which I’m naming “Patches & Plates”. 

I may change the outer border to add more scrappy squares.
The finished size will be around 40”x40”.


Thanks for stopping by.  Be sure to visit Patchwork Times for links to other design wall blog posts.
Happy Quilting!
               ~Diane

Thursday, March 21, 2013

Free Motion Friday - Mar 22, 2013

Yeah!  The quilt, "Bittersweet" is all quilted.  She still needs binding, but the hard part is all done.

As I mentioned in a previous post, I quilted the circle with feathers in the "X" blocks.  Then I quilted in the ditch around all the squares in the 16-patch blocks.   The final quilting in the border is a simple echoed feather design.  When I worked on the boarder I did not make the stem first and regretted it later.  In future, I plan to create the stem and then add the feathers.

I tried to keep track of the time it took me to quilt this project.  The final tally was 15.75 hours.  I did a lot of starting and stopping as well as twisting and turning of the fabric to get it into place so I could stitch.

Oh how I would love to have a machine with a larger arm.  On a recent trip to the sewing machine store I drooled over all the great machines on display.  I could get a bigger machine if I really wanted one, but I don't know where I'd set it up.  I love the cabinet I bought when I got my Ellure (which is what I use to do my machine quilting).  So, for the time being, I'll make due with what I have.  Perhaps I'll reduce the size of my future projects so that they are more manageable.


Thanks for stopping by.  Happy Quilting!
          ~Diane


Monday, March 18, 2013

Design Wall Monday - March 18, 2013

Over the weekend I worked on several different projects, one of which is this baby quilt.  The main blocks are my collage blocks scaled down to 9-inch square with pale yellow filler strips and sashing.  I plan to add a  2-inch border.  

Thanks for stopping by and be sure to visit Patchwork Times for links to other design walls.

Happy Quilting,
      ~Diane

Wednesday, March 13, 2013

WIP Wednesday - Quilting "Bittersweet"

At the beginning of the year I set an ambitious goal for myself:  piece together a scrap quilt and a baby quilt each month.  The following month I plan to do the quilting on those two projects as well as piece another scrap quilt and baby quilt.  Whew!  Things are going good so far.

I've dedicated this week to doing the quilting on "Bittersweet" which was a mystery quilt that I made from a large variety of scrap fabrics.  I blogged about making this quilt here and here.  Besides selecting the fabrics for a quilt project I find it hard to decide on the stitching pattern to use.


Normally I use quilt basting spray to secure my quilt sandwich but I ran out so I simply used safety pins.  The pins tend to get in my way as I sew but I was deliberate in where I placed them.  Once that was done, it was off to the machine for stitching.  First step was to stitch in the ditch, outlining the basic 8-inch blocks and get those pins out.  I did leave the pins in place that secure the outer edges of the quilt.


The next step was to make a tracing template for the design I'm quilting in the "X" blocks.  Last year, during the SewCalGal FMQ2012 Challenge, expert quilter Don Linn taught us how to make a template using an embroidery hoop and fine mesh tulle fabric. This technique worked well for this stage of my project.


So, after about four hours of sewing I have completed the ditching and nine of the "X" blocks.  This is the first time I've ever kept track of my quilting time and I'm curious just how long it really takes me.

I have another eleven "X" blocks to go and then it's on to the 16-patch blocks.  At this point I still have no idea how I will quilt those blocks.  I'm open for suggestions if you have any.

I'm linked up with WIP Wednesday over at Freshly Pieced.

Thanks for visiting and Happy Quilting,
         ~Diane


Monday, March 11, 2013

Design Wall Monday - March 11, 2013

Remember those miniature triangle squares I was working with last week.....here's what they turned into.  I felt like the little 3-1/2" blocks needed frames so I added a 2" strip around each one.  I picked fabrics that seemed to coordinate with some of the color in each block.  Now all I have to do is add the white binding on each and they'll be done.

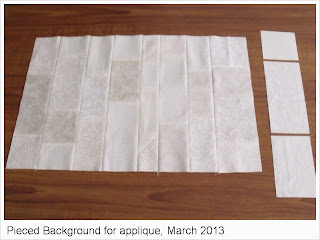
The other item I have on my design wall is the pieced background I'm making for an applique project.  Again, I'm grabbing fabric scraps and with a little ironing and trimming they are sewn into strips.  I am using cream-colored tone-on-tone fabrics so there will be subtle changes in the piece.

 I signed up for another Craftsy.com class....this one is called "Machine-Finished Hand Applique" and is taught by Beth Ferrier.  This is the first real applique class I've taken and Beth is an excellent teacher.  The class project is a small wall hanging with applique flowers, leaves and berries.
 I chose to go with values of purple for my flowers.  This should be interesting.  I also grabbed a yellow for the flower center.  I love pansies, the purple and yellow ones.  Just in case the yellow doesn't work out well, I made alternate pattern pieces using the pale purple for the centers.

Well, that's what's on my design wall.  Be sure to check out all the other projects that are linked to Patchwork Times.  Happy Quilting.

      ~Diane


Sunday, March 10, 2013

FMQ Practice Panel #2, Zippered Pouch

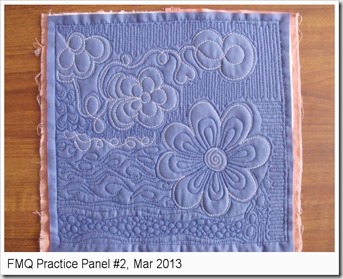
While trying to decided how to use the first free motion quilting practice panel, I discovered that I had used the identical blue fabric when test quilting a flower I was considering using in a baby quilt.  I had used white thread on the blue fabric so I could clearly tell if my tension setting were correct.  The more I looked at that flower panel it became apparent to me that it had to be part of the new project.  I didn’t change the thread colors in my machine, I just went with the royal blue.

PracticePanel-2
First off, I outlined the white stitching which made the flowers and loops seem to rise above the surface.  Then I stitched several different fill patterns, including those pebbles from the first panel….but not so many this time.  I have to say that I actually had fun making this panel. 
About half way through the stitching, I took measurements of the first panel and then outlined the second panel so that the two would end up being the same size and proceeded to complete the stitching on the second panel. 

After trimming both panels to identical sizes I dug through my zipper stash and found one that was close in color.  To connect the two panels at the bottom seam, I added a small strip of fabric and top stitched it down similar to the method used to connect quilt-as-you-go pieces.  I also added a narrow piece of fabric at the top edge of both panels so I would not have all the bulk of the batting to contend with while inserting the zipper. 

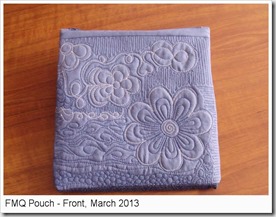
Pouch-FrontI chose not make a lining for this pouch, but now I’m thinking that I probably should have. 

When I figure out what fabric I want to use for a lining, I plan to turn the bag inside out and hand-stitch it along the top.  Since this will be a utility pouch it isn't really necessary to line it, but it would hide the raw edges of the fabric and batting along the sides and bottom seam. 


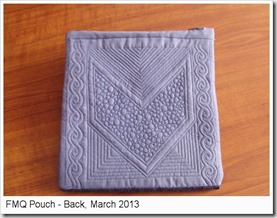
Pouch-back
The shapes and design of the first panel make me think of a jeans back pocket so this became the pouch “back” (although no one will know but me).

I had a good time with this project and think that I would like to make some more.  Perhaps I will be more thoughtful when I pick fabrics for my stitching test panels. 

The final measurement for this zippered pouch is 9” x 9” square.

Friday, March 8, 2013

Free Motion Friday - Practice panel

This is a panel I have set up to practice my free-motion quilting.  It's hard for me to take perfectly good fabric and batting just to make a practice sandwich.  I have to have a plan. And the plan for this panel is to incorporate it into a zippered pouch or bag.

Deciding on a quilting design is challenging to me.  It seems that when I sit down with a quilt in front of me, my brain goes blank.  I conclude that I need to practice more.

I used a royal blue 100% polyester thread on the top and a light blue for the bobbin.  When I flipped it over to check my stitching, I liked the look of the back as much as the front.
I have a diamond project in the works for the future so I traced a couple of them to establish a shape to begin with.  This was my first attempt at quilting a pebble pattern.  I found it a bit tedious for me; but this is a good filler if you want a really flat outcome like for place mats or handbags.

I'm linked up with FMQ Fridays over that the Free Motion Quilting Project.  Check it out!

Thanks for stopping by and Happy Quilting,
      ~Diane

On The Needles - March 8, 2013

I've been wanting to make this round dishcloth since I saw a dear friend making one several months ago.  I believe the pattern is one that has been handed-down and passed around for decades.  There are seven sections and each section consists of twelve rows.  No fancy stitches...just knit and an occasional yarn over.

I've never actually used a round cloth before but the size seems perfect for my hands.  As you can see, I used the Bronze Blue colorway of Sugar'n Cream cotton yarn and I think the multicolor yarn works well for this design.  As usual I used my favorite 16-inch circular size 8 plastic needles but straight needles would work just fine for this pattern.  I just like those needles because they're easy to handle.  The washcloth measures a little over 9" diameter.  

Another recent finish for me is the One Row washcloth that I blogged about a few weeks ago.  I have some commercially made dishcloths that are rectangular so I made this one longer instead of square and added some contrasting yarn for interest.  It measures 11-1/2" x 9".  

Thanks for stopping by.  Be sure to check out what others have on their needles this week at Patchwork Times.

          ~Diane


Tuesday, March 5, 2013

Back To Square One mystery quilt progress

Better late than never!

I thought about doing Judy's Back To Square One mystery quilt, but couldn't decided on the fabric colors so I put it off.  Then yesterday I was making plans for the baby quilt I'd like to make this month and this medallion would be perfect.  After an hour or more of  pulling fabrics, I came up with this combination.  It's not really baby colors, so it may end up being a wall hanging at the cabin.  I might even do some fancier quilting on it.....we'll see.

At any rate, here is my progress through clues 1 and 2.

         ~Diane

Monday, March 4, 2013

Design Wall Monday - Mar 04, 2013

I put together four of the little 3-inch blocks using leftover half-square triangle blocks.  I find it a bit difficult to actually trim down the squares to 1-1/2" size, but they are easy to sew together.  This is just one of the many block styles I want to explore.  At this point, I don't have a vision of how I'm going to use these little guys once they are made.  Ahhh, so many possibilities.  If you have any suggestions, please leave me a comment below.


So that's what I have on my design wall.  I'm linked up with Patchwork Times.    

I have so many different things going on right now.  Perhaps I should spend a day just getting myself organized so the rest of the week will be productive.

I am signed up for several classes at Craftsy.com one of which is the free Bag Making Basics with Kristin Link.  I've made lots of bags, pouches, totes and the like over the years, but it's good to see how others do things just in case there are tricks or techniques that I haven't used yet.  And the class is free so it's a win-win for me.  Sometimes its good to take a class just to get the nudge I need to make something that I've been putting off.  

I'm a sucker for boxes, containers, bags and pouches.  I tend to collect them like some people collect salt shakers, bird houses, or coins.  So I couldn't pass on making a new zippered pouch for myself.  I'm not sure what I'll put in it, but it'll be there waiting for me to decide.  With most new things I try, I grab leftover fabrics for the first attempt and that's what I did with this pouch.  It measures a smidgie over 9" x 5" which is a good size for some of my sewing supplies.  

A few years back, I made a pouch that I use for my sewing tools.  I make sure this is in my sewing machine travel case when I head off to quilt group.  As you can see it holds a lot of my essential tools.  

Thanks for stopping by.  May God bless your day!

      ~Diane

Friday, March 1, 2013

Free Motion Quilting - Baby's First Spring

Compared to the Log Cabin Throw this baby quilt has been a breeze to quilt on my domestic machine.  My guess is that it's about 1/3 smaller.  I used Warm & Natural cotton batting and flannel backing.  As usual I had a hard time deciding how to quilt this.  I settled on making a flower in the center of the large squares and then I did a wavy line outlining the square.  Then I continued with that style and did more exaggerated wavy lines in the frames and sashing.

This pic of the back shows the quilting much better.

I'm linked up with FMQ Friday at the Free Motion Quilting Project blog.

Thanks for stopping by and Happy Quilting!
          ~Diane

Related Posts Plugin for WordPress, Blogger...